
Image to Prompt: A Practical Reverse Prompt Workflow
Turn a reference image into an editable AI prompt with a six-layer reverse prompting workflow, copy-ready templates, failure diagnosis, and remix steps.
 Lem Gen Team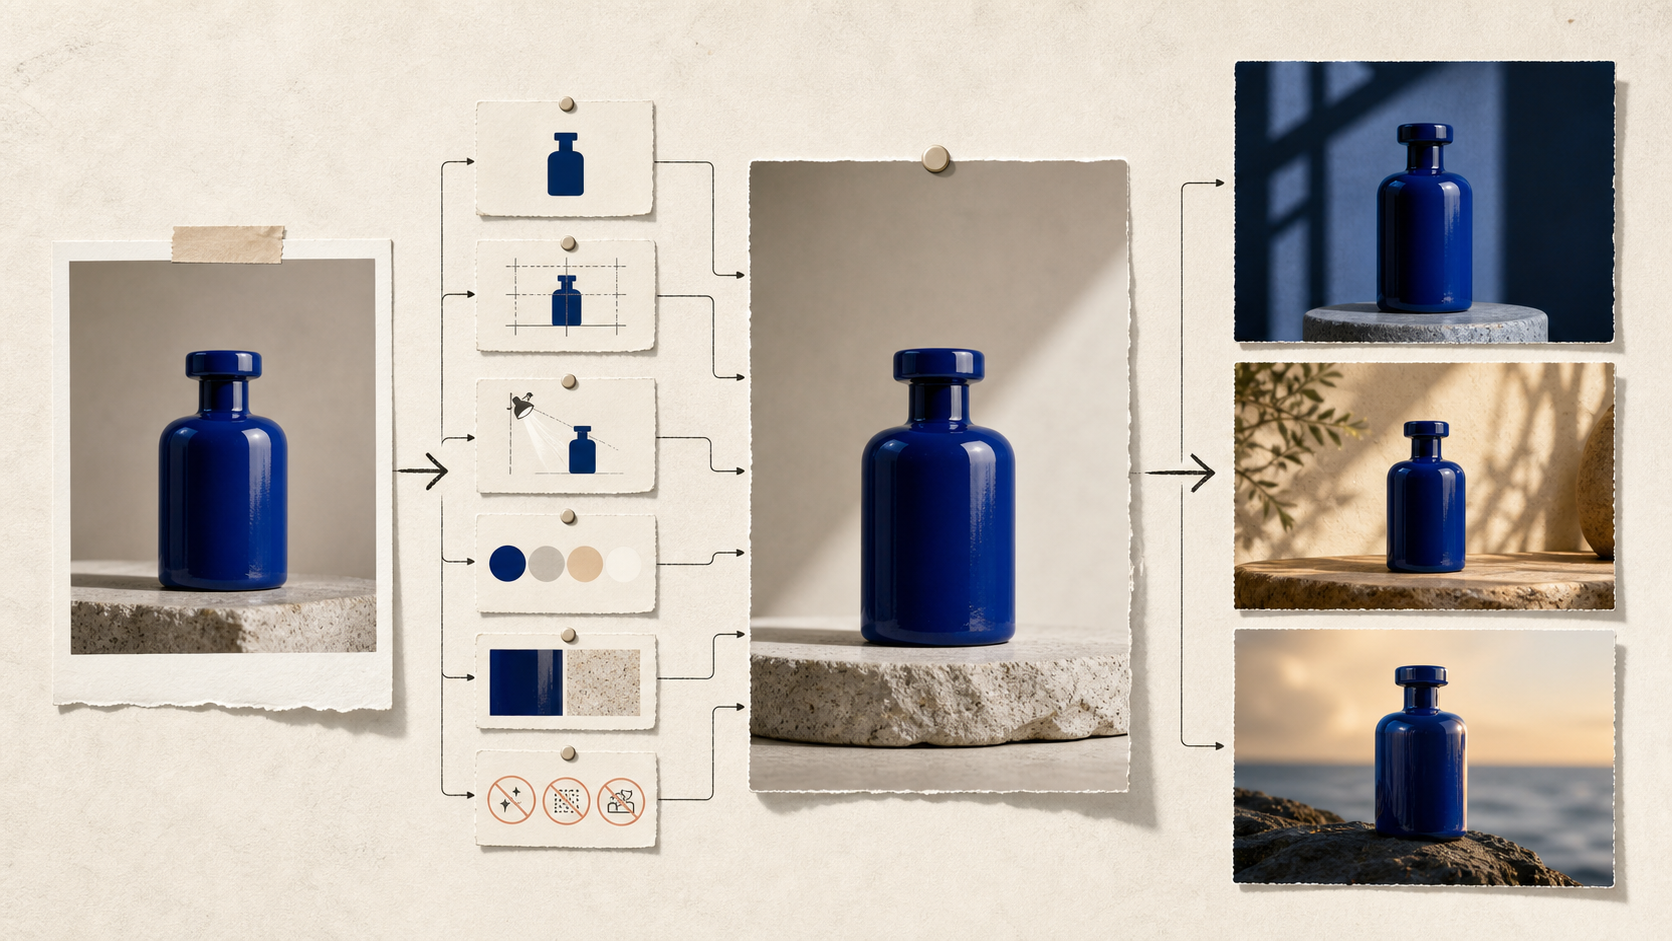
An image-to-prompt tool is most useful when it gives you a controllable brief, not when it pretends to reveal a secret sentence hidden inside the pixels. A finished image can show subject, framing, light, palette, texture, and spatial relationships. It cannot reliably reveal every deleted instruction, seed, model setting, reference weight, or edit that helped create it.
The practical goal is therefore simple: turn the reference into a structured prompt you can inspect, change, and test. You can start from the Lem Gen prompt library, study a focused collection such as GPT Image prompts, and then open the image-editing Workspace with GPT Image 2 selected when identity or product shape needs a reference.
This guide gives you a six-layer reverse prompting workflow, five copy-ready templates, a diagnostic loop, and a rights-safe way to turn inspiration into an original result.
If your real problem is not extracting structure from a finished image but keeping the same person or mascot recognizable across many new scenes, use the dedicated character consistency prompt workflow after you have chosen the anchor image.
When the reference will become publishing artwork, continue with the AI book cover prompt workflow. It separates key art, title-safe space, typography, and print production so a visually strong concept does not get mistaken for a finished cover file.
What image to prompt can and cannot recover
Reverse prompting begins with an information limit. The pixels are evidence of the final appearance, but they are not a complete record of the production process. A warm highlight might come from a large softbox, a window, a relight pass, or a painted gradient. A compressed portrait might come from a long lens, a crop, or a generated imitation of long-lens photography. The image supports a description of the effect, not certainty about the tool that produced it.
That distinction changes the quality of the prompt. Weak converters often produce a single dense paragraph filled with confident style labels. Strong analysis separates three things:
- visible facts: the bottle is centered, cobalt blue, glossy, and placed on pale stone;
- useful inference: the shadow pattern suggests a hard directional light;
- unknown production detail: exact lens, seed, model, reference weight, and editing history.
Labeling guesses as guesses makes the prompt portable. “Hard side light casting a rectangular window shadow” is useful across models. “Shot on an 85 mm lens at f/1.8” may add false precision when the image provides no reliable proof.
The six-layer reverse prompt blueprint
The best image-to-prompt result is modular. Each layer has a job, and each can be changed without rewriting the rest.
- Visual job: product hero, editorial portrait, social poster, storyboard frame, concept art, or ecommerce detail.
- Subject: identity, shape, pose, expression, product geometry, clothing, props, and what must remain unchanged.
- Composition: crop, viewpoint, subject scale, negative space, foreground/background relationship, and text-safe area.
- Camera and rendering: photographic viewpoint, depth cues, perspective, illustration medium, or 3D treatment, only as specific as the evidence permits.
- Light, color, and material: light direction, softness, contrast, palette, surface behavior, atmosphere, and texture.
- Constraints: elements to exclude, identity rules, text rules, aspect ratio, output purpose, and acceptable variation.
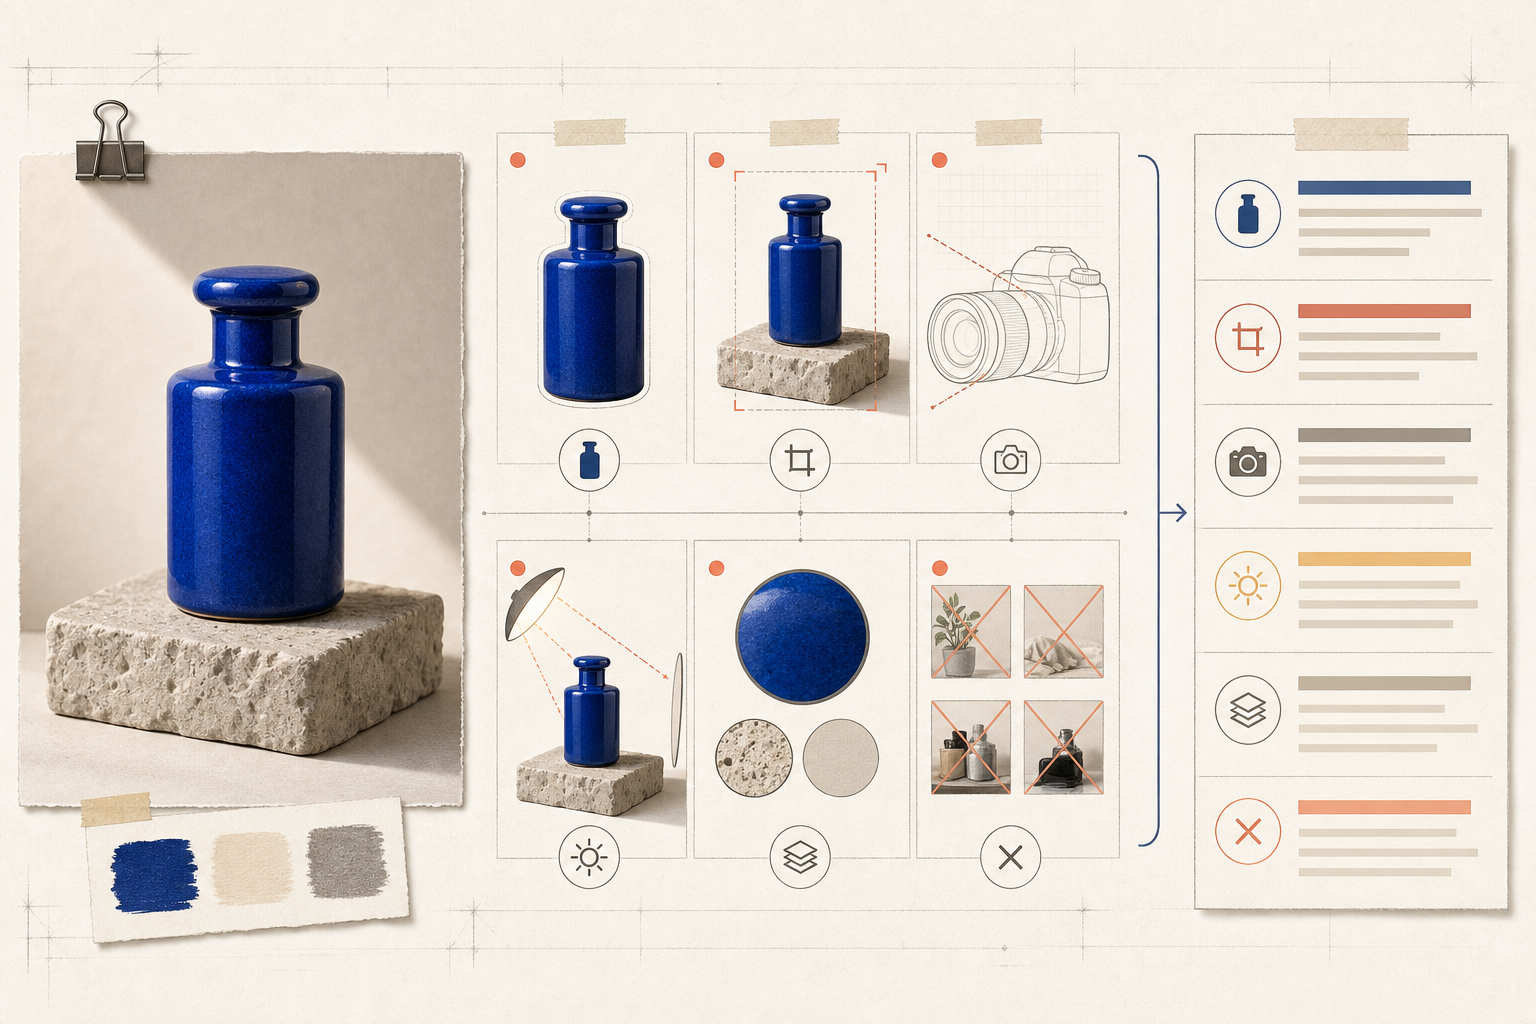
The six fields keep observation separate from inference and make each revision traceable.
The order matters. “Cinematic, beautiful, premium” does not tell the model what the image is for. A visual job and a stable subject do. Style and polish come later, after the composition can already be pictured.
For a related production case, see the product photography prompt workflow. It applies the same separation to a catalog or campaign image.
Step 1: define the visual job before describing style
Ask one blunt question: what must this image do? If the answer is “look similar,” the brief is incomplete. A reference may be attractive because it solves a specific problem: it makes a product silhouette obvious, leaves room for copy, communicates scale, or creates a particular emotional distance.
Write the job in one line:
Visual job: a 4:5 ecommerce campaign image that makes a small ceramic bottle
feel tactile and premium while leaving clean copy space above the product.
This sentence becomes your decision rule. If a later detail fights the job, remove it. A busy botanical background may match the reference’s mood but destroy label readability. A dramatic low angle may feel expensive but make the bottle cap look distorted. The job decides.
For more campaign-oriented examples, browse the product advertising prompt collection. Use it to compare how different prompts express hierarchy, not as a source to copy verbatim.
Step 2: inventory only what is visible
Make a literal inventory before interpreting the image. Work from large structure to small detail:
- one cobalt-blue ceramic bottle with a short neck and rounded cap;
- front three-quarter view, product occupying roughly half the frame height;
- pale porous stone plinth;
- warm gray background with no horizon line;
- highlight along the bottle’s camera-right edge;
- soft-edged shadow falling behind and left;
- restrained blue, cream, and stone palette;
- no label, logo, hands, foliage, or visible text.
Notice what this list avoids: “luxury,” “Mediterranean,” “timeless,” and “cinematic.” Those may be useful creative interpretations later, but they are not directly visible facts. Starting with facts prevents a style word from quietly changing the subject or setting.
If a person is present, be equally literal and cautious. Describe pose, gaze, clothing, crop, and observable expression. Do not infer ethnicity, health, profession, or personality from appearance. If the person is recognizable, make sure you have permission to use their likeness before uploading or generating variations.
Step 3: translate spatial relationships, not object lists
A common reverse prompt names every object and still misses the image. The reason is composition. Models need the relationship between elements:
- centered versus offset;
- close crop versus environmental view;
- eye-level versus top-down;
- shallow foreground versus layered depth;
- isolated subject versus overlap;
- symmetrical balance versus directional tension;
- open copy area versus edge-to-edge detail.
Use a composition block that could be sketched:
Composition: portrait 4:5 frame; bottle centered slightly below the midpoint;
camera at product height; stone plinth fills the lower quarter; background remains
uninterrupted; top third is quiet negative space; no object overlaps the silhouette.
Relative language is often more reliable than fake measurements. “Product fills 55% of frame height” can help when proportion is critical, but “dominant single subject with generous top space” is easier to transfer across aspect ratios.
Step 4: describe light by its effect
Do not begin with equipment names. First describe what the light does:
- direction: front, side, back, overhead, or mixed;
- hardness: crisp edge, soft wrap, or diffuse ambient fill;
- contrast: deep separation or open shadows;
- color: neutral, warm, cool, or mixed temperature;
- surface response: broad ceramic highlight, sharp glass reflection, matte absorption;
- background behavior: falloff, gradient, projected shadow, haze, or flat tone.
Then, if useful, add a plausible setup as an inference:
Lighting: warm hard key from upper camera-left creates a controlled diagonal
shadow; very soft neutral fill preserves detail in the cobalt glaze; no glowing
rim, no crushed blacks, no mirror-like hotspot on the cap.
This is more reliable than “professional studio lighting.” It tells the model what to render and what failure to avoid.
Step 5: encode materials as behavior
Material words become useful when paired with visible behavior. “Ceramic” alone can become chalky, plastic, or metallic. Describe how it interacts with light and how perfect it should look.
For the bottle:
- deep cobalt glaze with subtle tonal variation;
- broad soft reflection, not chrome;
- tiny handmade surface irregularities;
- crisp silhouette with a slightly rounded shoulder;
- cap and body share the same material;
- no transparent glass, plastic seams, or printed label.
For the plinth:
- pale limestone or travertine;
- porous edge, small pits, matte finish;
- stable rectangular geometry;
- no marble veining or glossy polish.
The specificity should serve the task. If you plan to replace the bottle with a sneaker, preserve the lighting logic and composition but rewrite every material instruction. This is why modular prompts remix better than one long paragraph.
Step 6: write exclusions as concrete failure controls
A negative prompt should not be a dumping ground for every defect you have seen. Tie each exclusion to the visual job. For a clean product hero:
Constraints: preserve one bottle only; no label, logo, hands, flowers, duplicate
objects, floating props, text, watermark, warped cap, transparent glass, clipped
silhouette, excessive depth blur, or background horizon line.
Positive constraints can be stronger than negatives. “Keep the entire bottle silhouette clear” is easier to act on than a long list of possible obstructions. Combine both when the failure is expensive, such as changing product geometry or adding unauthorized branding.
A copy-ready image-to-prompt master template
Use this version when you need a portable brief rather than model-specific syntax:
VISUAL JOB
[What the image must accomplish, target format, and audience context]

SUBJECT
[Observable identity, geometry, pose, expression, props, and invariants]

COMPOSITION
[Aspect ratio, viewpoint, crop, subject scale, spatial relationships, negative space]

CAMERA OR MEDIUM
[Photographic perspective, depth behavior, illustration/3D medium; avoid false precision]

LIGHT + COLOR
[Direction, hardness, contrast, temperature, palette, background behavior]

MATERIALS
[Surface texture, reflectivity, imperfections, edge quality, fabric or product behavior]

CONSTRAINTS
[What must remain, what must not appear, text rules, identity policy, acceptable variation]
Run the first test without embellishing it. The baseline tells you whether the model understood the structure. If you add mood, era, art direction, typography, and camera jargon before testing, you will not know which instruction caused the drift.
Three reverse prompt variants for different goals
The same reference needs a different prompt depending on the job.
Variant A: faithful product reconstruction
Use this only with an image you own or are authorized to edit.
Create a clean product study of the authorized reference bottle. Preserve its
cobalt ceramic material, rounded cap, shoulder proportions, and one-object
silhouette. Match the product-height viewpoint, pale stone plinth, warm gray
backdrop, and directional window-like shadow. Keep the label area blank. Change
no product geometry. 4:5 portrait, copy-safe top third.
Variant B: style grammar, new subject
Create a premium campaign image of an original matte-red portable speaker.
Use the reference only for visual grammar: single centered subject, low stone
plinth, warm neutral background, directional rectangular shadow, restrained
palette, and quiet top copy space. Do not reproduce the bottle, its silhouette,
or any distinctive branding. 4:5 portrait.
Variant C: controlled creative expansion
Create three original campaign directions for the same unbranded cobalt ceramic
bottle: dark architectural side light, warm botanical morning light, and cool
coastal sunset. Preserve bottle identity and cap geometry. Change only setting,
light, and camera height. Keep one bottle per frame and no text or logos.
Variant C is especially useful because it turns reverse prompting into a small experiment. You are no longer asking for “more creative.” You are naming the axes allowed to move.
Test with a controlled baseline
Open the Lem Gen Workspace in image-editing mode, upload an image you are allowed to use, and generate one baseline. Keep these choices fixed for the first comparison:
- the same generation mode and model;
- one aspect ratio;
- one reference image;
- one prompt version;
- no extra style references;
- no simultaneous subject and composition rewrite.
A controlled workflow moves from reference to fields to variations; it does not chase an unknowable original sentence.
Compare structure before surface polish. Is the subject the right size? Is the camera height close? Is the negative space in the correct place? A beautiful texture cannot rescue a wrong silhouette or crop.
Diagnose one mismatch at a time
When the baseline fails, classify the largest error instead of rewriting everything.
| Mismatch | Likely responsible field | Targeted repair | | ------------------------- | ------------------------ | ---------------------------------------------------------------------- | | Subject too small | Composition | State frame occupancy and crop more clearly | | Product shape changes | Subject / constraints | List invariant geometry; use authorized image editing | | Light feels flat | Lighting | Add direction, hardness, shadow placement, and fill behavior | | Surface looks plastic | Materials | Describe reflectivity, texture, imperfections, and forbidden materials | | Scene becomes cluttered | Visual job / constraints | Reinforce single-subject hierarchy and quiet background | | Result copies too closely | Creative boundary | Replace subject, setting, story, palette, or viewpoint deliberately |
Use a one-change revision note:
Revision 02, composition only:
Keep the subject, materials, light, and background unchanged. Increase the bottle
to about half the frame height and restore an uninterrupted top third for copy.
Save the baseline, revision, and reason. A small change log becomes more valuable than a folder of unnamed generations because it tells you which instruction moved the result.
Turn a reverse prompt into an original prompt
Reverse prompting should end in a creative decision, not a replica. Keep the underlying visual solution and change at least two meaningful axes:
- subject: bottle to speaker, shoe, lamp, or original character;
- setting: studio to kitchen, transit platform, garden, or abstract stage;
- narrative: static hero to assembly, reveal, comparison, or use moment;
- camera: eye-level to macro, overhead, low angle, or environmental wide shot;
- palette: preserve contrast logic while replacing the actual colors;
- material: glazed ceramic to brushed metal, fabric, translucent resin, or paper;
- light: preserve hierarchy while changing time, direction, or shadow language.
The earlier guide on remixing a GPT Image prompt without copying it goes deeper on that transition. If the final asset needs motion, the Seedance video prompt pattern guide shows how to add camera movement, subject continuity, and a deliberate ending rather than treating an image prompt as a video script.
Rights, privacy, and honest boundaries
Public availability is not permission. Before uploading a reference, confirm that you own it, have a license, or have permission from the creator and any recognizable person. Avoid extracting and recreating logos, protected characters, private documents, signatures, watermarks, or a living artist’s distinctive work for commercial imitation.
For client work, record the source and allowed use. If the reference is only directional, say which properties may transfer, such as lighting rhythm or empty-space strategy, and which must not. That note protects the creative team from treating “inspiration” as blanket permission.
Also be honest about model variance. A reverse prompt can improve control, but it cannot guarantee pixel-level reproduction across different models or even repeated runs. If exact product geometry matters, use an authorized reference-image editing workflow and inspect the output. If exact text matters, treat it as a separate design layer rather than trusting incidental rendering.
A practical quality checklist
Before saving the prompt, ask:
- Does the first line state the visual job?
- Are visible facts separate from guesses?
- Can someone sketch the composition from the text?
- Does lighting describe direction, hardness, shadow, and surface response?
- Do material words explain behavior rather than add adjectives?
- Are identity and geometry invariants explicit?
- Are exclusions tied to real failures?
- Is the prompt compact enough to diagnose?
- Have you changed meaningful creative axes before commercial reuse?
- Are the reference rights and likeness permissions clear?
If three or more answers are “no,” do not make the prompt longer. Rebuild the missing fields.
Frequently asked questions
Can an image-to-prompt tool recover the exact original prompt?
Usually not. Pixels do not store every instruction, seed, model setting, edit, or reference. The useful output is a testable visual brief, not a forensic transcript.
What should an image-to-prompt result include?
At minimum: visual job, subject, composition, camera or medium, light and color, materials, and constraints. Those fields make revisions traceable.
Should I use text-to-image or image editing?
Use text-to-image for a fresh interpretation. Use image editing with an authorized reference when product shape, layout, or identity needs stronger continuity.
Why does a detailed reverse prompt still produce a different image?
The description cannot recover hidden conditions such as model behavior, seed, reference weight, crop history, and post-processing. Spatial language may also be interpreted differently.
How do I avoid copying the reference too closely?
Keep the useful visual grammar, then change subject, setting, narrative, camera, palette, or material. Remove logos, recognizable identities, protected characters, and distinctive elements you do not have permission to use.
How long should the prompt be?
Long enough to define the job and constraints. Start compact, generate a baseline, identify one mismatch, and revise the responsible field. Precision beats adjective count.
Build your reusable prompt, then test it
Prompt length matters less than traceability. Start with a visual job, separate observation from inference, write six modular fields, and run a controlled baseline. Then change one thing for a stated reason.
Use the Lem Gen homepage and prompt library to find a reference pattern, explore portrait prompt structures or Nano Banana prompt examples, and continue in the preselected GPT Image 2 editing Workspace. Save the version that solves your job, even if another version sounds more impressive.
When you want to turn that recovered brief into a repeatable model-specific test, the Nano Banana prompt workflow shows how to lock invariants and change one named variable per revision.
If the next step is animation rather than another still-image revision, continue with how to make a GPT Image 2 character sheet before Seedance. That article picks up after the reverse-prompt stage and turns the approved identity source into a motion-ready character package.