
AI Product Photography Prompts: Reference-to-Listing Workflow
Build AI product photography prompts that protect product shape, packaging details, lighting, and listing intent with a repeatable reference-to-image workflow.
 Lem Gen Team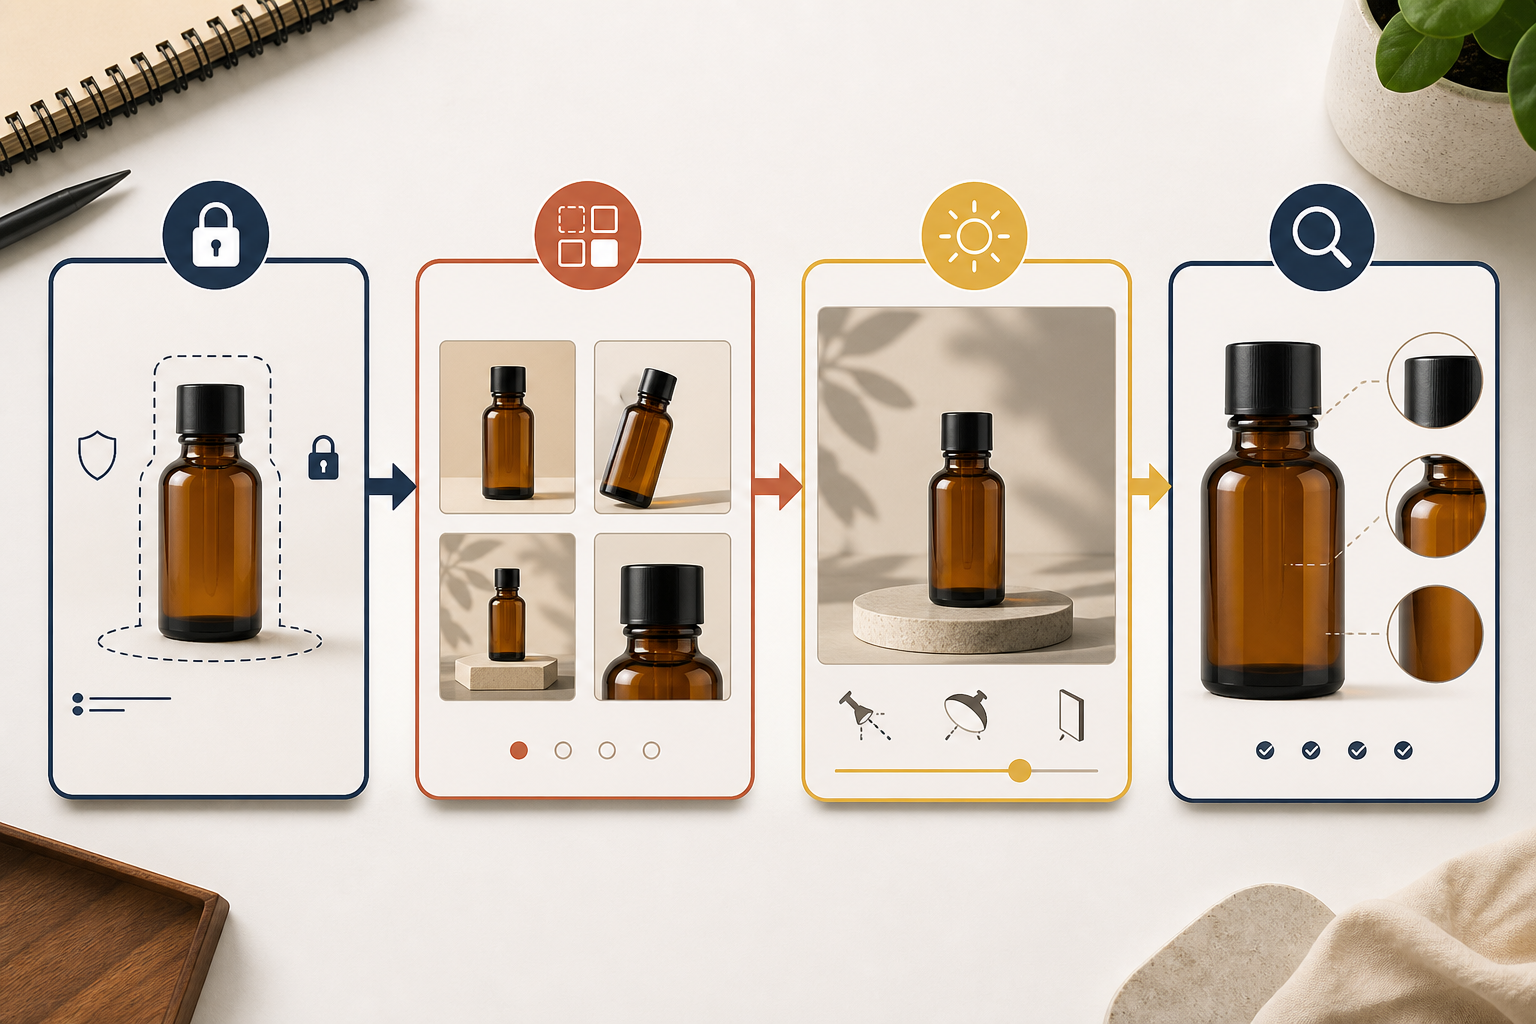
AI product photography prompts work best when they describe a production job, not a pile of flattering adjectives. The product has to stay recognizable. The scene has to support the listing or campaign. The prompt has to tell the image model what may change and what may not.
That is a different problem from making a pretty product image. A new scene can change the bottle shoulder, bend a package edge, invent a label, or make a matte finish look like glass. The workflow below treats those changes as reviewable failure modes. If the package itself is still being designed, establish its structure and information hierarchy with the AI packaging design prompt workflow first. Then start at the Lem Gen prompt library, open the product-ad prompt collection, inspect the GPT Image prompt hub, and use the Workspace with image editing selected when an authorized product reference must guide the result.
The two supporting articles belong to the same internal cluster. The image-to-prompt workflow explains how to read a visual reference before writing; the prompt remix workflow explains how to change a useful structure without copying its subject.
Keep the product stable while the shot job, scene, light, and review decision move through separate stages.
The image above is a first-party workflow illustration, not a claim that a model will preserve every product detail automatically. The reference answers what the product is, the shot job answers where the image will be used, and the review answers what changed in the pixels.
Choose the listing job before the visual style
Write one sentence that explains where the image will be used. A white-background catalog image needs a clean silhouette and a controlled shadow. A detail shot needs material and texture. A lifestyle image needs context without letting props compete with the product. A campaign hero needs a visual idea and enough negative space for copy.
Shot job: ecommerce listing image
Product: unbranded amber skincare bottle from Reference 1
Success check: bottle shape, cap, liquid color, and label layout remain recognizable
Output: 4:5 portrait, product fills about 65% of the frame
The shot job prevents a common failure: asking every image to be a dramatic hero. It also gives you a clear rejection test. If the result looks attractive but cannot explain the product or fit the intended placement, it failed the job.
Lock the product reference
Use an image you are allowed to use. The reference should show the whole object, its important edges, and the surface details that matter to a buyer. If the source is a phone photo, remove clutter only when the removal does not hide a product defect or change the color.
Reference policy:
- Reference 1 is the product identity source.
- Preserve silhouette, proportions, cap geometry, label placement, and material.
- Change only the background, surface, lighting, and supporting props.
- Do not invent a second logo, slogan, ingredient claim, or extra package.
“Preserve everything” is too broad to be useful. Name the invariants. A cosmetic bottle may need its cap and shoulder locked; a shoe may need sole shape, stitching, and logo placement locked; a food package may need front-panel text checked manually after generation.
Separate product facts from art direction
Keep the product description factual and put the creative direction in another block. This makes revisions local. If the product drifts, tighten the product block. If the scene is dull, change the art direction without rewriting the identity description.
Product facts:
amber glass bottle, short cylindrical cap, cream label, dark blue mark,
slightly rounded shoulders, filled to the same visible level as Reference 1

Art direction:
quiet morning bathroom, pale limestone shelf, soft window light from the left,
muted blue wall, one folded linen towel, natural contact shadow
Do not guess hidden specifications. If you do not know the lens, exact material coating, or original lighting setup, describe the visible effect instead: “soft side light with a broad highlight” is safer than an invented camera setting.
Describe the composition as relationships
Product prompts improve when they explain where objects sit relative to one another. Give the product a scale, viewpoint, crop, and breathing room. Mention the area that must stay clear if the image will receive a headline or price badge later.
Composition:
three-quarter front view, camera slightly above the product,
product centered on the lower third, cap fully visible,
open darker space in the upper left for short campaign copy,
no prop overlaps the label or silhouette
This is more useful than “high-end composition.” The relationships can be inspected in the output. They also transfer to other products without pretending that one adjective controls the whole frame.
Treat light and material as separate controls
Lighting tells the model where the information comes from. Material tells it how the surface should respond. A glossy bottle needs controlled reflections. Matte cardboard needs broad, quiet highlights. Brushed metal needs directional variation without turning into chrome.
Light: large soft source from upper left, gentle fill from camera right,
moderate contrast, readable label, soft shadow falling behind and right
Material: satin-coated paper label, amber glass, translucent liquid,
avoid mirror reflections and plastic-looking highlights
When the product looks wrong, change one of these blocks. Adding “premium, realistic, detailed” to the end rarely tells you whether the failure came from the light, the material, or the reference.
Use one prompt for one shot type
Create a small shot set instead of forcing one master prompt to cover every channel. The product block can remain stable while the shot block changes.
Catalog: seamless warm-white background, front view, even light, clean shadow.
Detail: close crop of cap and label edge, raking light, texture in focus.
Lifestyle: product on a limestone shelf, quiet bathroom context, no hands.
Hero: product on a dark stone plinth, controlled rim light, copy space above.
The four prompts are deliberately plain. Their job is to create comparable candidates. A useful content system can later add seasonal color, props, or camera movement without losing the base record.
Write exclusions that protect the listing
Negative constraints are most helpful when they describe a plausible failure. “No bad quality” is too vague. Name the object or change you cannot accept.
Exclude: altered package proportions, misspelled or invented text,
new logos, duplicate products, extra caps, floating object,
cut-off silhouette, harsh blown highlights, unrelated props,
watermarks, borders, and text outside the original label area.
Exclusions do not guarantee a clean result. They reduce ambiguity and give the reviewer a checklist. If packaging text is legally or commercially important, inspect the pixels and replace the label through an approved design workflow rather than trusting the generation.
Run a controlled reference-to-image loop
Generate a baseline with a fixed reference, model, aspect ratio, and shot job. Then change one variable. For example, keep the product and composition fixed while testing limestone, brushed steel, and paper. This shows whether the issue is the scene or the product reference.
Iteration record
Reference: product-front-01.png
Shot: lifestyle
Scene variable: background surface = pale limestone
Keep fixed: product block, crop, light direction, aspect ratio
Review: silhouette pass; label pass; material pass; shadow pass
Lem Gen can help you keep the prompt record close to the visual source. Use the image-to-prompt workflow when you are starting from a successful reference and need to separate observable details from guesses. Use the prompt remix workflow when the structure is useful but the product and campaign need to be yours.
Inspect product fidelity before aesthetics
Review in this order: silhouette, proportions, label and logo placement, color, material, contact shadow, crop, then overall mood. This order prevents a beautiful background from hiding an inaccurate product.
Fidelity pass
[ ] silhouette matches the authorized reference
[ ] cap, sole, handle, or other signature geometry is intact
[ ] label and visible claims are readable or intentionally replaced
[ ] product color is plausible under the new light
[ ] contact shadow supports the object instead of floating it
[ ] crop leaves the required safety margin
Save rejected outputs with the reason. “Looks off” is not useful for the next iteration. “Cap became wider and the label moved 8 mm left in the frame” tells you which constraint needs attention.
Keep a prompt record for the next channel
The approved image is only one part of the asset. Store the reference filename, prompt, shot type, aspect ratio, model selection, output URL, and review note. A later social crop or video frame can then start from a known product state instead of a fresh guess.
Asset record
Product ID: amber-bottle-01
Reference: product-front-01.png
Shot type: lifestyle
Model mode: image editing with product reference
Approved changes: background, surface, soft side light
Not approved: label redesign, silhouette changes, unsupported claims
This record is also a rights check. Keep the source reference and permission basis with the prompt. Do not pull a competitor's product photo into a generation workflow just because it has the lighting you want.
Move from a listing image to a campaign set
Once the catalog image passes fidelity review, derive the campaign set from it. Keep the product reference fixed and vary the story: morning routine, desk scene, shelf detail, or gift-ready composition. Each scene should have a reason to exist and a different crop requirement.
Use a short handoff sentence in every derived prompt: “The product in Reference 1 is the same approved object; change the environment only.” That sentence does not replace visual inspection, but it keeps the intention visible when prompts are copied between projects.
Know when prompting is not enough
A general image model is not a packaging proofing tool. If the image will make a regulated claim, show an exact ingredient panel, reproduce a barcode, or represent a technical part, use a deterministic design or retouching step for the information that must be exact.
Prompting is also not a substitute for product rights. Use your own product, a client-approved asset, or a reference with documented permission. If a recognizable person, logo, character, or competitor package appears in the reference, remove it or obtain the needed authorization before publication.
Build a small prompt library around the product
One product usually needs more than one visual, but it does not need a new writing system for every image. Keep a stable identity block and maintain a short set of shot blocks. The identity block should contain the internal product name, reference filename, details that must stay fixed, and details that may change. The shot block should contain the use case, crop, scene, light, and exclusions for that placement.
For a catalog image, keep the scene quiet. Avoid props that create a false size comparison or hide the label. For a detail image, make the crop deliberate and name the surface detail the viewer should inspect. For a lifestyle image, choose one environment that explains how the product is used. For a campaign hero, define the visual idea in plain language and reserve an area for copy.
This library makes review faster because the same failure can be compared across outputs. If the bottle cap drifts in every scene, the identity block is too weak or the reference is unsuitable. If the cap is stable but the shadow floats in one scene, the problem belongs in the shot block. Recording the location of the failure prevents random prompt expansion.
Compare prompts with a fixed review sheet
When testing a new model or mode, hold the reference, crop, and shot job constant. Render two or three candidates, then review them with the same sheet. Do not choose the most dramatic frame before checking the product. A quiet image with the right silhouette is often a better starting point than a striking frame with a changed package.
Comparison sheet
Candidate A: silhouette pass / label pass / material pass / scene pass
Candidate B: silhouette pass / label pass / material pass / scene pass
Decision: keep A, keep B, or revise one named field
Reason: one concrete pixel-level observation
Keep the prompt and the decision together. If a later editor only sees the winning image, they may repeat a rejected variation or assume that a generated label was approved. The record is small, but it protects the next iteration from losing context.
Use the Workspace as the final drafting step
The prompt library is for planning and reuse. The Workspace is for making the next controlled draft with the selected generation mode and, when appropriate, an image reference. Before submitting, check the reference, model, aspect ratio, and prompt text. After the result arrives, compare the object against the source before spending time on captions or campaign copy. Save the approved source and the prompt record as a pair.
FAQ
The short answers below cover the decisions that cause the most rework. They are also the checks to carry into a new product brief.
Can an AI product photography prompt keep my packaging unchanged?
It can request that the reference product stays locked, but it cannot make a blanket guarantee. Check the silhouette, label, color, and small details in the rendered pixels.
Should I generate from text or a reference image?
Text is useful for concept exploration. An authorized reference is the better starting point when the product must remain recognizable.
What is the most important prompt field?
Name the shot job and the product invariants first. The scene and style should serve that job.
Why does the product drift between scenes?
Each generation solves a new image. Keep the same reference and identity block, then change one scene variable at a time.
Can I use these images in a marketplace listing?
Check the marketplace rules and verify that the image accurately represents the item. Generated imagery is not evidence that a product has a feature it does not have.
How many prompts do I need?
Start with one master brief and derive catalog, detail, lifestyle, and hero versions. Keep the product block stable.
The practical loop is short: define the shot, lock the product, describe the scene, generate one controlled variant, inspect the pixels, and record the decision. Lem Gen's product-ad prompts give you starting structures; the Workspace is where an authorized reference can become a usable draft.
If you need the same locked product block to survive repeated still-image variations, use the Nano Banana prompt workflow to separate invariants from the one variable each revision is allowed to change.
If the same review logic needs to hold a recurring person or mascot stable across many scene changes, the dedicated character consistency prompt workflow uses the same protected-details principle with a stricter identity anchor.